Chicken Parmesan Baked!

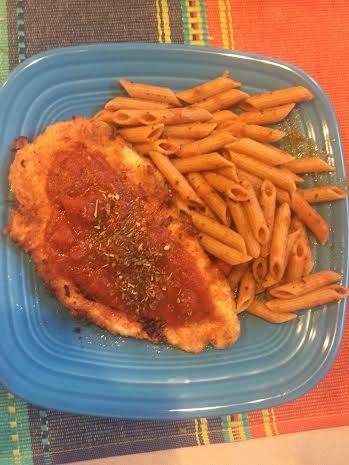
Italian food is my husband’s favorite kind of food. I typically don’t make it because of high carb and calorie content. However, I recently found a healthier option to Italian food. Chicken parmesan that is baked! It is still lightly fried for the crispy texture, but it is a much lighter option than what you would eat at an Italian restaurant. I usually make whole wheat penne pasta instead of regular spaghetti noodles as well.

chickparm

I hope you enjoy this version of chicken parmesan as much as my family! My recipe below is from an original recipe of Self Proclaimed Foodie. You can find their recipe here: Perfect Chicken Parmesan

Baked Chicken Parmesan

Serves Four

  • 4 boneless chicken breasts (skinless)
  • 3 cups of penne pasta
  • salt & pepper
  • 1/2 cup all purpose flour
  • 1 egg, beaten
  • 1 cup of bread crumbs
  • 1/2 cup grated parmesan cheese
  • 1 teaspoon dried basil
  • 1 teaspoon dried oregano
  • 1/4 cup olive oil
  • 1 (25 ounce) jar pasta sauce

Preheat oven to 400 degrees F. Use plastic wrap to cover chicken. Use a meat pounder or rolling pin to tenderize meat. Make about a half-inch thick.

Have three bowls on the counter. Add flour to one bowl. Add the beaten egg to another bowl. Combine the bread crumbs, ½ cup of parmesan cheese, along with basil, oregano, salt and pepper into the third bowl.

Heat oil in a large skillet over medium-high heat. Dredge chicken in flower, then coat with egg, then cover with the bread crumb mixture. Press coating onto chicken to get as much as possible to stick.

When oil is hot (when you see bubbles coming from the bottom of the pan), add your coated chicken to the pan. Cook each breast about two minutes on each side, or until golden brown. Remove from the pan and transfer to a baking dish. Cover each breast with some pasta sauce. Make sure to reserve some of the sauce for the pasta on the side. Cook chicken in the oven about 5-10 minutes.

Bon Appetit!

Advertisement

Easy No-Bake Cookie Recipe

Some days my sweet tooth calls and it’s time to bake! When I want something easy and quick, these no-bake cookies are always top of the list. I usually always have the ingredients on hand, and they are very scrumptious! Another plus is they make several cookies, so there is always enough to share with your family, friends, and neighbors!

cooking oats

complete cookies

I shared the cookies before I could take a photo of final product. This unfortunately is a theme in our household.

One of my favorite recipes is from Brown Eyed Baker. You are welcome to get the recipe below, or view it here at Brown Eyed Baker’s site: No-Bake Chocolate Peanut Butter Oatmeal Cookies 

No-Bake Chocolate Peanut Putter Oatmeal Cookies

Makes two dozen

  • 1/2 cup of unsalted butter
  • 2 cups of granulated sugar
  • 1/2 cup of whole or 2% milk
  • 4 tablespoons unsweetened cocoa powder
  • pinch of salt
  • 1/2 cup of peanut butter
  • 2 teaspoons of vanilla extract
  • 3 cups of quick-cooking oats (I used old-fashioned oats)

Add the first five ingredients (through the salt) to a 4-quart saucepan. Bring to a rapid boil and let boil for one minute. Remove from heat. Stir in the peanut butter and vanilla extract until smooth, then stir in the oats.

Use a medium cookie scoop (or 2 tablespoonfuls), drop onto parchment-lined baking sheets. Let cool until set, about 30 minutes.

Cookies can be stored in an airtight container at room temperature (or in the refridgerator) for up to two weeks.

Pork Chops and Rice

One of my favorite meals growing up was pork chops and rice (mostly the rice!). It is sure to bring happiness to your belly! Since this is one of my favorites, I wanted to share it with you. Who knows, this might become your family’s favorite too!

porkchops1

porkchops2

porkchops3

porkchops4

porkchops5

porkchops6

porkchops7

I couldn’t get a photo of the final product before the family grabbed a plate and started eating!

porkchops8

Pork Chops and Rice

Serves four

  • 4 boneless pork chops
  • 6 small (or 4 large) green onions, sliced
  • 1 green bell pepper, diced
  • 1 ½ cups of raw white rice
  • 1 can of Chicken and Rice Soup (I use Campbell’s)
  • 1 soup can of water
  • 4 chicken bouillon cubes

Preheat oven to 350 degrees. Flour, salt, and pepper pork chops. Brown pork chops in skillet, at medium/high heat, and remove. Pour out most of the grease. Reduce heat to low/medium. Add onion, bell pepper, bouillon cubes, and rice. Stir until brown. Add soup and water. In a covered casserole dish, line the bottom of the dish with button. Once bouillon cubes are dissolved, pour vegetables and rice mixture into the covered casserole dish. Place pork chops on top. Bake for about one hour, or until all the moisture is absorbed and rice is tender.

Bring the family together and create this dish tonight. It will be fun to make, and your taste buds will thank you!


Easy Meal Night

Sometimes, work days are long and you don’t want to spend a lot of time on dinner. Or maybe the pantry is getting low, and  the options are limited. One of my family’s favorites are hobo dinners. They are tasty and so easy to put together. Super easy clean up too! Our family’s recipe makes four servings, and they are great to reheat and have as leftovers too.

hobo1

hobo2

hobo3

Hobo Dinners 

Serves four

  • 1 lb. of ground meat
  • 4 slices of bacon
  • 1 package of frozen corn
  • 3-4 medium potatoes, peeled and sliced
  • 1 package of carrots
  • 1 small can of mushrooms, sliced
  • 1 can of green beans, drained
  • 1 small onion, small
  • grated cheese
  • margarine
  • foil

To make individual dinners, you will need four large pieces of heavy-duty foil (approx. 18-24 inches wide). Preheat oven to 400 degrees (fahrenheit). Shape the ground meat into fourt patties. Salt and pepper both sides, and place in the center of each piece of foil. Slice the bacon into halves and place on top of each patty. Divide the green beans and frozen corn onto each dinner. Divide the potatoes and carrots onto each dinner. Salt and pepper (we add seasoning salt too). Add onions, mushrooms,  grated cheese, and a pat of margarine. Wrap tightly and place on a baking sheet. Bake for one hour, or until potatoes are tender.

If you are ever missing some ingredients, it is still okay to make the meal. It just allows you to be more creative!

Happy dining!

Going Bananas

When your bananas are going bad, and you are trying to think what to do with them, the first thing that probably comes to your mind is banana bread. I wasn’t in the mood for banana bread this time, so I researched some recipes to use for my four bananas. Both were two thumbs up on the taste factor, and I wanted to share these recipes with you today:

My favorite find was the peanut butter, banana, and oat blender muffins. I found it on the blog, Like Mother Like Daughter. Not only was this an easy recipe, it really fills you up! Below is the recipe, and you can find it directly from the blog too: Peanut Butter, Banana, and Oat Blender Muffins

muffins

Peanut Butter, Banana, and Oat Blender Muffins

Serves 18 regular, or 26 mini muffins

  • 2 cups old fashioned oats
  • ½ cup peanut butter
  • 2 ripe bananas
  • 2 eggs
  • ½ cup plain greek yogurt (or vanilla)
  • ¼ cup honey
  • 1 tsp vanilla
  • 1 tsp baking powder
  • ½ tsp baking soda
  • ½ tsp salt
  • ½ cup chocolate chips or nuts, optional

Preheat oven to 400 degrees. Place all ingredients (except chocolate chips or nuts) into a blender and mix until smooth. Mix in chocolate chips or nuts if desired (I put the chocolate chips and nuts just on the top of the muffins). Pour batter into a muffin tin lines with muffin liners, or grease muffin tin (regular or mini)well with nonstick spray. Fill ¾ full. Bake for 7-8 minutes for mini muffins, and 9-12 for regular muffins.

I still had two bananas to go, and I wanted something sweet for dinner. I found some great banana drop cookies from the blog, LOVEFOODIES (recipe by C&H) , and they are a yummy treat. The recipe is located below, and you can aslo find it on the blog is here: Banana Drop Cookies

bananacookies

Banana Drop Cookies

Makes approximately 50

  • 1¼ cups sugar
  • 2/3 cup butter
  • 1 teaspoon vanilla
  • 1 cup banana; mashed well
  • 2 Eggs, beaten
  • 2¼ cup flour
  • 2 teaspoons baking powder
  • ¼ teaspoon baking soda
  • ½ teaspoon salt
  • 1/2 teaspoon cinnamon
For topping (optional, but I did it)
  • 1/4 Cup sugar
  • 1 teaspoon cinnamon

In small bowl, combine flour, baking powder, baking soda, and salt and 1/2 teaspoon of cinnamon. Cream sugar, butter, and vanilla until light and fluffy. Add eggs and beat well. Stir in banana. Slowly mix dry ingredients into wet. Chill 30 minutes in refrigerator. Preheat oven to 400. Drop teaspoon sized balls of dough two inches apart on greased cookie sheets. Sprinkle with cinnamon/sugar mixture; if desired. Bake 8-10 minutes or until browned. Cool 2 minutes, then transfer to racks.

I hope you enjoy these recipes, and best of luck to your baking creativity with your bananas! If you have any tasty banana recipes, please share and I would love to try them!


Sweet Snacks

This past Sunday was the the Super Bowl, and I hope you all had a blast! In Texas, we don’t take our football lightly. Our neighborhood was filled with barbecue, food, and a lot of fun.

This Sunday also gave me an excuse to make some fun treats. I showed our team spirit with muddy buddies and some no-bake peanut butter rice krispies cookies.

IMG_7979

With the left over muddy buddies, I got a little creative for Valentine’s Day too! I simply put different colors of M&Ms in the jar instead of Bronco colors. You can easily turn the rice krispies cookies into pink heart-shaped cookies too!

IMG_7956

Below are the ingredients for the muddy buddies and the no-bake peanut butter rice krispies cookies:

Muddy Buddies (recipe from the back of the Chex cereal box):

  • 9 cups Chex cereal. Any flavor will work. I used Rice Chex for mine.
  • 1 cup semi sweet chocolate chips
  • 1/2 cup peanut butter
  • 1/4 cup butter or margarine
  • 1 teaspoon vanilla
  • 1 1/2 cups powdered sugar

Put the measured cereal in a large bowl and set aside. In a one-quart microwaveable bowl, microwave chocolate chips, peanut butter, and butter uncovered on high for one minute. Stir. Microwave about 30 seconds longer, or until the mixture can be stirred smooth. Stir in vanilla. Pour mixture over ceral, stirring until evenly coated. Pour into a two-gallon resealable food-storage plastic bag. Add powdered sugar. Seal bag and shake until well coated. (one tip from me – I usually put some powdered sugar at the bottom of the plastic bag to make the coating a faster process). Once coated, spread onto waxed paper to cool. Store in airtight container in refrigerator.

*Don’t forget to add your desired colored candies to go with your theme. I used plain M&Ms.

IMG_7952

No-Bake Peanut Butter Rice Krispies Cookies (recipe from Martha Stewart’s website here: No-Bake Peanut Butter Rice Krispies Cookies):

  • 1 cup light corn syrup
  • 1/2 cup granulated sugar
  • 1/2 cup light brown sugar
  • 1 1/2 cups salted peanut butter
  • 2 teaspoons pure vanilla extract
  • 4 cups Rice Krispies

Line a 9 x 13-inch baking pan with wax paper or baking parchment. Place the corn syrup and sugars in a large saucepan over medium heat and stir to combine. Bring to a boil. Remove from the heat. Stir in the peanut butter and mix well to combine (this is where I added the food coloring as well). Quickly stir in the vanilla and Rice Krispies. Spread into the lined baking pan. Cool and slice into squares.

*Note: I did not spread the Rice Krispies into a pan. Instead, I shaped the design with my hand and put them on wax paper. If you are doing heart shapes for Valentine’s Day, you could let them cool and then use a cookie cutter or shape them in the cookie cutter while they are still warm.

For the icing, I simply mixed powdered sugar, water, and food coloring until the consistency was right for me. I put the icing in a plastic storage bag and cut the corner with scissors as an icing bag. I’m not a professional, so they aren’t perfect. But that never bothers me because I alwayas have a blast making them.

IMG_7969

I hope you all have a wonderful week! I will chat with you again soon! Don’t forget to follow me on Facebook, Instagram, and Twitter too!